 Black friday 50% Off:
Quick Start: How to Build a DIY Christmas Village Display
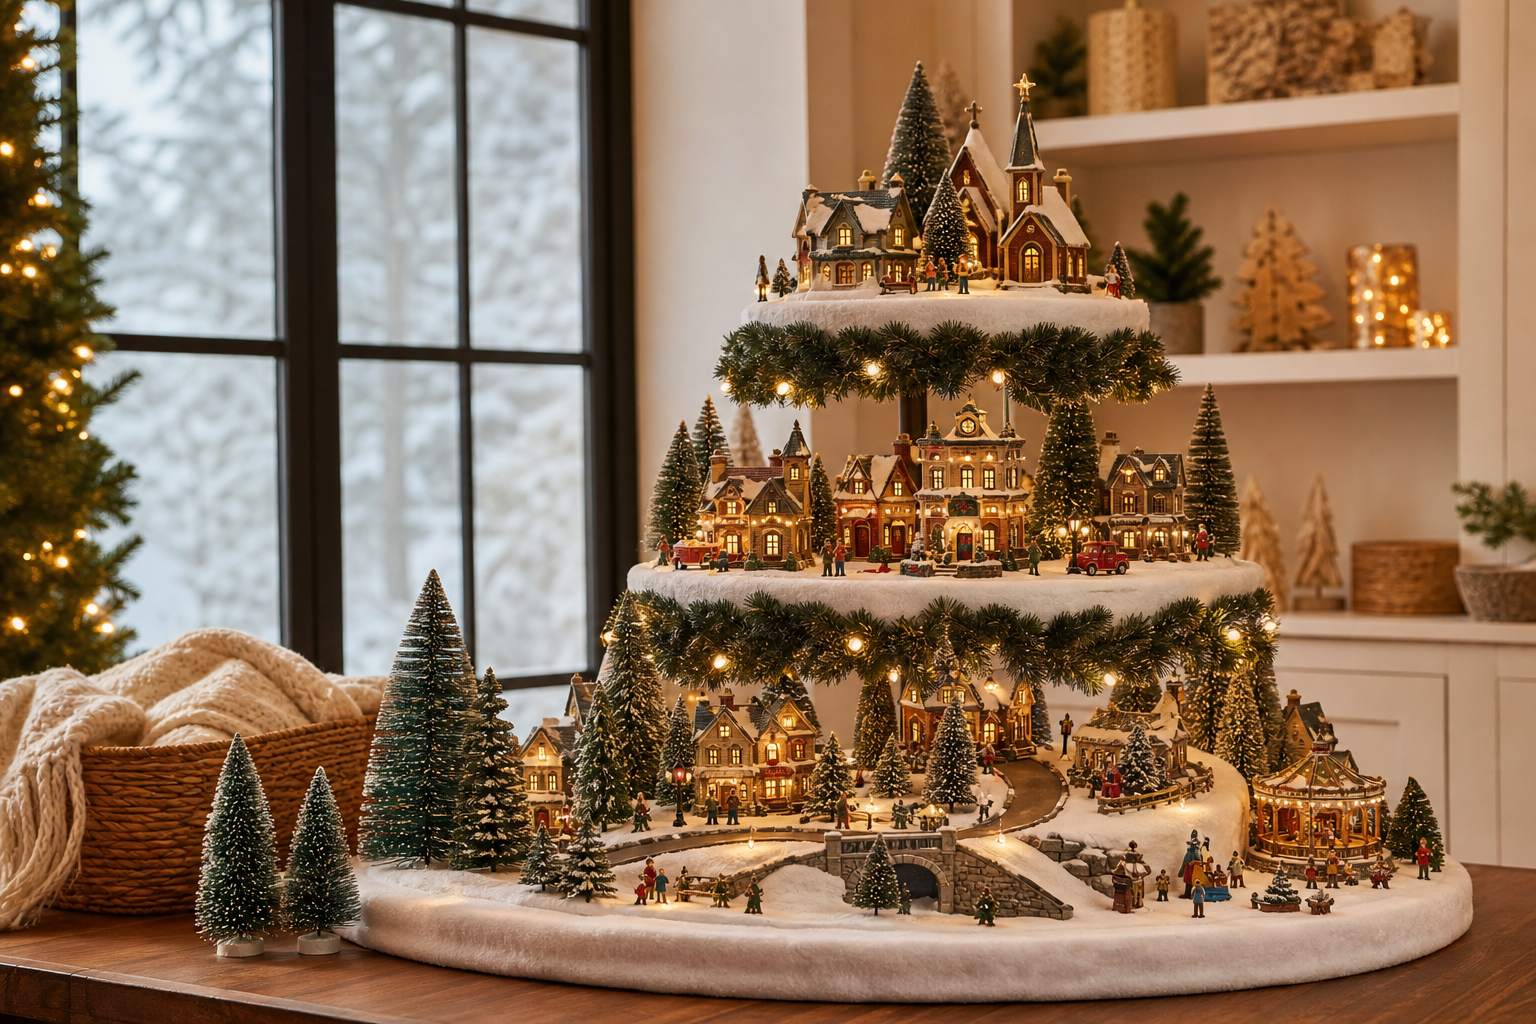
Sketch a simple layout, place taller buildings in back, and add height with risers so every piece is visible. Build a sturdy base from foam boards or a tabletop panel, hide cords under “snow,” and plug into protected power. Use stacked boxes/shelves or a tiered display stand; a pre-lit display tree like Momentree’s can provide ready-made tiers and décor while you customize the scene.
Key Takeaways
- Plan sightlines first: tallest in back, step down toward the front.
- Create elevation with risers, shelves, or a tiered stand to add depth in small spaces.
- Hide wiring using channels in foam and snow blankets; route cords safely to a power source.
- Choose your support style: DIY platforms, stacked risers, wall shelves, or a pre-lit display tree.
What You Need: Materials and Tools
Common DIY materials
- Rigid foam sheets (XPS/EPS) or foam boards for lightweight bases and carveable terrain
- Wood panels (e.g., MDF/plywood) or sturdy cardboard for tabletops and shelves
- Fabric snow blankets, felt, or scenic snow to cover risers and hide seams
- Scenic elements: bottle-brush trees, gravel/road material, backdrops
- Adhesives: foam-safe glue, hot glue (foam-safe), tacky wax for small figurines/lampposts
Tools and supplies
- Cutting tools: craft knife, utility knife, or hot-wire foam cutter (for foam)
- Measuring tape/ruler, pencil, masking tape
- Paint/brushes for backdrops or terrain touch-ups
- Cord clips, cable ties, and timer/smart plug for lighting control
Stand and tier options
- DIY shelves: wall-mounted ledges, bookcases, or mantels with added risers
- Simple risers: stacked boxes/crates or foam blocks concealed under snow
- Ready-made tiered stand: a pre-lit, garland-decorated display tree can supply built-in tiers for villages while you focus on styling. For example, the Christmas Village Display Tree – Pre-Lit packages a tiered, modular structure with Christmas décor and lighting.
Step-by-Step: Planning Your Christmas Village Layout
1) Define your theme and story
- Pick a focal area (town square, mountain lodge, seaside village). Gather buildings and accessories that support the theme.
- Rough-sketch a top view. Mark tall pieces, roads, water/ice areas, and where viewers will stand.
2) Design with elevation and depth
- Arrange tallest buildings at the back and step heights forward so nothing is hidden.
- Add risers: stack foam blocks/boxes under a snow blanket for quick height; use shelves or a single higher back platform to create layers in small spaces.
- For natural terrain, layer rigid foam and shape hills/ledges; cover with plaster cloth for a hard shell before finishing with scenic snow.
3) Place buildings, figures, and scenery
- Group related pieces into mini-scenes (e.g., station + passengers, bakery + carolers). Leave pathways between scenes so the village reads clearly.
- Stagger trees and lampposts to frame views and guide the eye. Use tacky wax to steady small accessories.
4) Plan backdrop, lighting, and wiring
- Add a simple backdrop (painted board or printed scene) to extend depth without taking floor space.
- Sketch a cord plan. If using foam, carve shallow channels or holes to route cords and exit neatly at the back.
- Consolidate power using listed power accessories appropriate for your pieces; keep cord runs tidy and out of walkways.
5) Consider tiered stands/trees as layout shortcuts
- Tiered display stands can inspire circular or spiral arrangements and make multi-level composition straightforward.
- A pre-lit village display tree supplies built-in tiers and seasonal décor so you can focus on arranging buildings and figures.
Building the Base and Tiers: DIY vs. Ready-Made Options
DIY bases and risers (simple and flexible)
- Tabletop board: Place a rigid panel or foam sheet on a stable table; add non-slip pads and edge setbacks.
- Stacked risers: Use boxes/crates or foam blocks under a snow blanket to lift back rows.
- Carved terrain: Layer rigid foam, carve slopes, and cover with plaster cloth for a durable, lightweight landscape.
Pros
- Custom sizes/shapes; easily adapted to corners, mantels, or shelves
- Inexpensive materials and widely available tools
Considerations
- Cutting/finishing takes time and creates debris
- Cord routing and stability are all on you; test before loading fragile pieces
Ready-made tiered display trees (pre-configured structure)
- A tiered, modular stand provides circular levels for villages without building shelves from scratch.
- As an example, the Christmas Village Display Tree – Pre-Lit keeps the modular platform structure and adds Christmas-specific decoration and lighting, so you start with tiers already dressed for the season.
Decorating, Finishing Touches & Electrical Safety
Styling ideas
- Snow layering: Use blankets as a base, then add loose scenic snow sparingly to blend seams.
- Roads and water: Paint or apply scenic materials for roads; use reflective film or painted foam for ponds.
- Trees and accessories: Mix sizes of bottle-brush trees; cluster figures into small story vignettes.
Safe lighting practices
- Use lights and power accessories that are listed/certified by recognized labs (e.g., UL). Check labels for indoor vs. outdoor use and follow manufacturer instructions.
- Inspect cords and plugs; replace damaged sets. Do not overload outlets or power strips; avoid daisy-chaining extensions.
- Route cords where they won’t be pinched, under rugs, or across walkways. Keep cords and décor away from heat sources and open flames.
- Turn off or unplug displays when unattended or before bed; timers or smart plugs help automate shutoff.
- Use manufacturer-specified low-voltage adapters for miniature buildings/animations; do not substitute unlisted or wrong-voltage adapters.
- Avoid hazardous products like male-to-male extension cords entirely.
Notes for pre-lit displays
- If your pre-lit stand offers multiple lighting modes, choose one that complements your scene. The Christmas Village Display Tree – Pre-Lit includes decorative string lighting with selectable modes, so you can match sparkle to your village ambiance.
Momentree Expert Tip: Making Setup Easier
- Pre-plan power access and final location. If your stand has wheels, position it before loading delicate buildings; avoid rolling a fully loaded display.
- On modular stands with tier-edge holes, use removable hooks to hang mini garlands, ornaments, or signage without adhesives on the tiers.
- Building vertically? Assemble tiers progressively and test stability as you go, then style from the top down to avoid bumping lower scenes.
Common Mistakes and How to Avoid Them
- Overcrowding: Leave breathing room between buildings and scenes so sightlines stay clear.
- Unstable structures: Use level, sturdy furniture; keep heavier items on lower levels. If using tall shelving near active areas, consider anchoring it to wall studs.
- Risky wiring: Don’t run cords under rugs or across walkways. Use listed extension cords and power strips with overload protection, and match ratings to your load.
- Heat hazards: Keep displays away from fireplaces, heaters, and candles; never leave open flames near decorations.
- Child and pet safety: Keep small parts and button batteries out of reach; protect cords from chewing and avoid tinsel around pets.
FAQ: DIY Christmas Village Display Essentials
What materials are best for building a Christmas village display base?
Rigid foam sheets or a sturdy tabletop board (e.g., MDF/plywood) work well. Cover with a snow blanket or felt to hide seams and risers. Foam is easy to carve for hills; boards provide a firm, level platform.
How can I create elevation or tiers in my Christmas village display?
Stack boxes or foam blocks under fabric snow, use wall shelves/mantels, or carve multi-level foam terrain. A tiered display tree provides built-in circular levels if you prefer a ready-made structure.
Are there ready-made stands or trees for displaying Christmas villages?
Yes. Tiered village display trees exist, including pre-lit options with seasonal garland. The Christmas Village Display Tree – Pre-Lit pairs a modular, multi-tier structure with Christmas decoration and integrated lighting.
How do I add lighting to a DIY Christmas village display safely?
Use UL-listed (or equivalent) lights, inspect cords, avoid overloading outlets, keep cords off walkways and away from heat, and turn the display off when unattended. Follow each building/accessory’s power instructions—use only the specified adapters.
What are common mistakes to avoid when setting up a Christmas village scene?
Overcrowding pieces, unstable risers, cords across walkways, placing décor near heat sources, and overlooking child/pet hazards. Plan sightlines and wiring before loading the display.
Can I build a display that easily stores or moves after the holidays?
Build on modular pieces (foam layers, removable risers) so you can break down and store flat. Many tiered stands can be disassembled for flat-pack storage; some bases include wheels for careful repositioning. Move stands before loading fragile items.
What’s the difference between DIY platforms and pre-lit Christmas village display trees?
DIY platforms are highly customizable and budget-friendly but require cutting/finishing and your own wiring plan. Pre-lit display trees start with a tiered, modular structure plus Christmas décor and lighting, so you can focus on arranging buildings and scenes.
How do I keep wiring for lights and accessories neat and safe?
Carve shallow channels in foam, route cords behind/under stable platforms, secure with clips/cable ties, and cover with snow materials. Keep runs off floors and away from heat sources; power down when unattended.
Related Guides and Further Inspiration
- What is a modular tiered display system? — Explore the core platform concept behind multi-level displays.
- Holiday Display Tree — See the reusable base platform this Christmas configuration is built on.
Sources and Further Reading
- Lemax: How to build a beautiful village in a small space (risers, layering snow)
https://www.lemaxcollection.com/village-journal/how-to-build-a-beautiful-village-in-a-small-space/ - HGTV: Christmas village display ideas (height variation, styling)
https://www.hgtv.com/lifestyle/holidays/christmas-village-display-ideas-pictures - National Model Railroad Association: Beginners Guide – Scenery (foam layering techniques)
https://www.nmra.org/beginners-guide-part-6-scenery - Woodland Scenics: Plaster Cloth Instructions (building lightweight terrain shells)
https://woodlandscenics.woodlandscenics.com/instructions/PLSTRCLOTHinst.pdf - Department 56: Beginner tips (tacky wax, cord concealment)
https://www.department56.com/pages/start-collecting - CPSC: Seasonal & decorative lighting products (safety characteristics)
https://www.cpsc.gov/Business–Manufacturing/Business-Education/Business-Guidance/Household-Electrical-Products/Seasonal-and-Decorative-Lighting-Products - UL Solutions: Safe lighting tips for the holidays
https://www.ul.com/news/safe-lighting-tips-keep-season-bright - UL Standards & Engagement: Holiday Safety Guide
https://ulse.org/holiday-safety-guide/ - ESFI: Holiday decorating electrical safety (cord routing, overload)
https://www.esfi.org/holiday-safety-tip-2-decoration-cords/ - NFPA: Winter holiday safety tip sheet
https://content.nfpa.org/-/media/project/storefront/catalog/files/safety-tip-sheets/winterholidaysafetytips.pdf - CPSC: Stop using male-to-male extension cords
https://www.cpsc.gov/content/Stop-Using-Male-to-Male-Extension-Cords - Lemax: Power adapter FAQs (follow manufacturer-specified adapters)
https://support.lemaxcollection.com/support/solutions/articles/36000198602-power-adapter-faq-s - AAP HealthyChildren: Holiday decoration safety (kids, button batteries)
https://www.healthychildren.org/English/safety-prevention/at-home/Pages/Holiday-Decorations-Safety-Tips.aspx - CPSC AnchorIt!: Preventing furniture tip-overs
https://www.anchorit.gov/ - ASPCA: Holiday safety tips for pets
https://www.aspca.org/pet-care/general-pet-care/holiday-safety-tips


