 Black friday 50% Off:

Quick Answer: What Is a Christmas Village Display Tree?
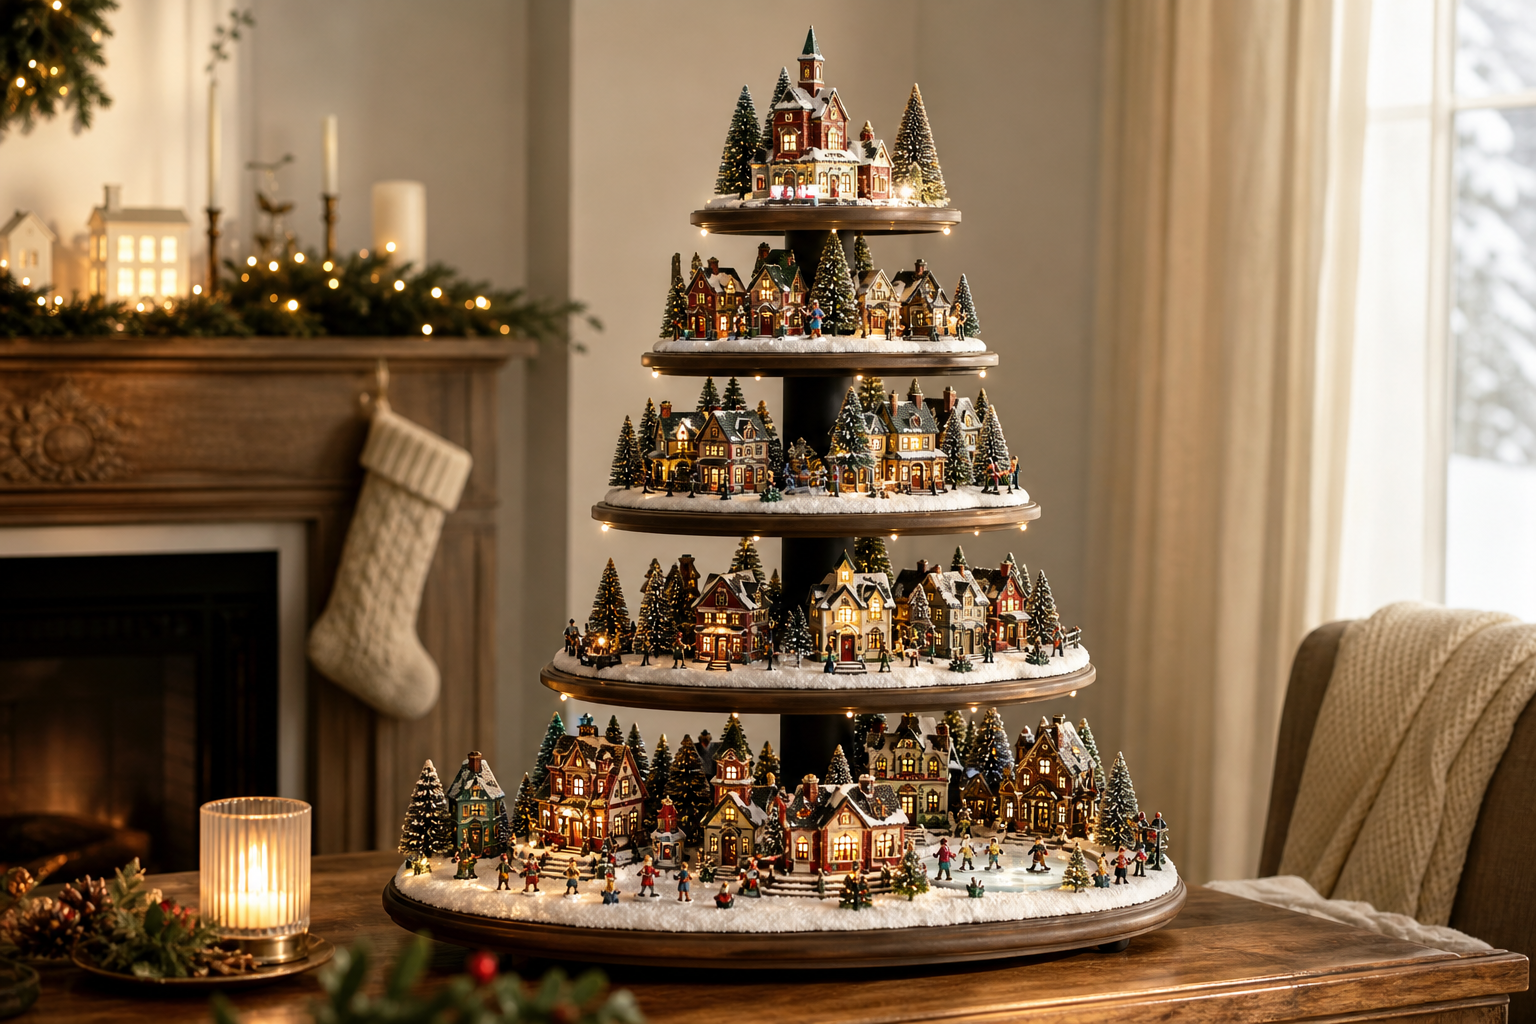
A Christmas village display tree is a vertical, multi-level structure—often shaped or styled like a tree—designed to showcase miniature houses, figurines, and scenery in layered tiers. It creates a dramatic focal point while organizing pieces for clear viewing. You can build one DIY (using risers or ladder-style shelves) or choose a modular, ready-made product—such as a pre-lit configuration like Momentree’s Christmas Village Display Tree—to streamline structure and styling.
Key Takeaways
- A display tree creates a central, layered showcase for your miniatures and scenery.
- You can design one from scratch or use a modular/ready-made stand.
- Specialized options, like the Momentree Christmas Village Display Tree, come themed and ready to style.
- Good planning, careful assembly, and thoughtful lighting elevate the final look.
Understanding Christmas Village Display Trees: Styles & Visual Concepts
Christmas village collectors use a range of formats to create visual height, depth, and storytelling.
Common formats and structures
- Tiered or multi-level “tree” stands: Round or stacked tiers let you “build upward,” making the most of vertical space.
- Ladder or A‑frame shelves as a tree: DIYers often adapt ladder-style shelving to stage villages on graduated steps.
- Tabletop, mantel, bookshelf displays: For small spaces, shelves and mantels keep villages visible and close to outlets.
Visual concepts that work
- Layered depth: Elevate back tiers and step down toward the front so the scene reads like a town, not a flat line.
- Spiral or tree-shaped layouts: Wrap pathways or buildings in a gentle spiral from bottom to top to guide the eye.
- Theming with a focal point: Choose a “town square,” church, or skating pond as the anchor to avoid visual clutter.
- Roads and backgrounds: Lighted paths and backdrop elements direct attention and create day/night mood changes.
Why vertical presentation helps
- Visibility: Multi-level tiers keep tall buildings and key scenes unobstructed.
- Organization: Zones (main street, park, residential) are easier to read when they’re separated by height/tiers.
- Small-space adaptability: Building upward is a popular way to fit a rich display into a compact footprint.
Planning Your Display: Layout, Sizing, and Key Design Principles
Smart planning ensures your display is safe, readable, and easy to power.
Layout and sizing
- Measure the intended location and check sightlines from typical viewing angles (seated and standing).
- Identify nearby outlets early—especially if you use animated or multiple lighted pieces.
- Plan zones: Group similar buildings (e.g., shops together) so the layout reads like a real town.
Scale and visibility
- Place taller buildings toward the rear or higher tiers; medium pieces mid‑level; smaller details up front.
- If mixing brands/series, group by similar scale so scenes look cohesive.
- Curate your pieces. Fewer, well-placed items usually look better than trying to display everything at once.
Wiring and safety basics
- Inspect light strings for damaged wires or sockets before use; follow the label for maximum connections.
- Keep cords out of walkways and never run them under rugs or pinch them behind furniture.
- Turn off all decorations before leaving home or going to sleep.
Display Approaches: DIY Stands vs. Modular/Ready-Made Display Trees
Both paths can yield beautiful results—choose what fits your space, tools, and timeline.
DIY approaches
- Common materials: Ladder shelves, A‑frame ladders, stacked risers/boxes, foam risers, plywood platforms.
- Pros: Fully custom size/shape, budget control, satisfying build for makers.
- Considerations: Stability, cord routing, paint/finish work, and storage are fully on you.
Modular/ready-made stands
- What they offer: Purpose-built tiers, repeatable structure each year, and a clear framework for cords and decor.
- When to consider: You want a tall, layered focal point with predictable assembly and a clean, consistent look.
- Example option: Commercially packaged, Christmas‑focused stands such as Momentree’s pre‑lit configuration can provide a themed base that’s ready to style with your miniatures.
Spotlight: The Momentree Christmas Village Display Tree – Pre-Lit
The Christmas Village Display Tree – Pre‑Lit is a Christmas‑focused configuration built on Momentree’s modular base platform. It’s designed specifically for arranging miniature villages and seasonal figurines on dedicated display tiers.
What sets it apart
- Built on a modular, multi‑tier base platform designed for reconfiguration across different occasions, then packaged for Christmas village use.
- Christmas decoration supplied: Pre‑decorated garland featuring green branches, red berries, and pinecones.
- Decorative lighting included: String lighting with 8 selectable modes (Combination, In wave, Sequential, Slo glo, Chasing/flash, Slow fade, Twinkle/flash, Steady on).
- “Easy to set up” per brand materials.
How the structure supports your village
- The platform provides stacked display tiers for arranging houses, people, trees, and accessories as layered scenes.
- Structural assembly builds upward from the base (center support sections, then tiers), with Christmas‑decorated tier components added during assembly.
Explore the product page: Christmas Village Display Tree – Pre‑Lit
Step-by-Step: How to Assemble and Arrange a Christmas Village Display Tree
Follow these steps whether you’re using a DIY structure or a modular/ready-made stand. Momentree‑specific notes are included where relevant.
1) Choose a safe location and plan power
- Pick a level surface with viewing space and nearby outlets. Sketch zones (e.g., town square, shops, park).
- Inspect any light strings before use; follow the product label for max connections.
2) Assemble the base and center support (Momentree)
- Begin by installing the stand base according to the manual’s base fasteners.
- Connect center support sections and prepare to add tiers progressively.
3) Install lower tiers first (Momentree)
- Install the first tier per the manual’s hardware steps, using the specified fasteners and washers.
- For middle tiers, use the included screw washers as instructed to improve steadiness.
4) Add the top tier (Momentree)
- Complete the sixth/top tier using the manual’s designated fasteners and pole type.
5) For pre‑lit configurations (Momentree Pre‑Lit)
- Add the supplied pre‑decorated Christmas garland and string lighting as you build up the tiers.
- Route cords neatly along the center support. Keep cords out of walk paths; don’t run them under rugs.
6) Stage major buildings first
- Place the tallest structures toward the rear or upper tiers; heavier pieces go on lower levels or close to the center for stability.
7) Build streets, paths, and story moments
- Lay roads and paths to guide the eye. Create a focal point (e.g., a town square) and build scenes around it.
8) Add people, trees, and small accessories
- Fill foreground tiers with smaller pieces. Use removable museum putty/wax to help secure delicate items; test on an inconspicuous area first.
9) Light the scene thoughtfully
- Evaluate the display with room lights on and off. Aim pathway lights or accent lights to lead the eye toward your focal building.
- Turn all lights off before bed or when away from home. Keep display elements away from heat sources.
10) Final safety and stability check
- Ensure the base is level and all screws/fasteners are tight. Follow the product’s weight guidelines and supervise children around the structure.
Expert Tips for a Show-Stopping Christmas Village Display
- Compose in layers: Tall at the back/high tiers; smallest at the front. Group by neighborhood or theme to keep mixed collections cohesive.
- Keep it stable: Place heavier items on lower tiers or near the center of the structure.
- Curate, don’t crowd: A focused selection around a clear focal point usually reads better than displaying every piece.
- Make lighting do the storytelling: Use gentle pathway lights and accents to highlight the town square or church; test the look under different ambient light levels.
- Route and hide wiring: Use clips along supports and disguise excess cord with snow drape or scenic materials where appropriate.
- If your stand offers attachment points: Use available edge holes and removable hooks to hang small ornaments, signage, or accents without cluttering tiers.
Momentree Expert Tip
- Care and cleaning: Dust the structure with a soft cloth. Keep it away from open flames and high heat.
- Use environment: Indoors or covered outdoor areas only; secure the structure firmly for events and supervise children nearby.
- Weight and stability: Do not exceed the product’s weight guidelines; if the structure feels wobbly, tighten all screws and confirm the base is on a level surface.
- End‑of‑season storage: Remove garlands and accessories before storing. Disassemble for flat‑pack storage and keep in a dry area.
FAQ: Christmas Village Display Trees Explained
What is a Christmas village display tree and how does it differ from traditional village setups?
It’s a vertical, tiered structure that presents buildings and figures on multiple levels, creating a tree‑like focal point. Compared with a flat tabletop layout, the multi‑tier design improves sightlines, helps organize zones, and makes a dramatic centerpiece.
What are the best ways to arrange miniature houses and figurines on a display tree?
Place tallest buildings on rear or higher tiers, medium items mid‑level, and small accessories at the front. Build zones (main street, park), add paths, and light key scenes. Use removable museum putty/wax to help secure delicate items.
How do you safely add lights to a Christmas village display tree?
Inspect light sets first, use only listed indoor lights as directed, and follow the label for maximum connections. Keep cords out of walk paths and never under rugs. Turn decorations off before sleeping or leaving home, and keep them clear of heat sources.
Are there modular or ready-made display trees specifically for Christmas villages?
Yes. Modular stands and packaged, Christmas‑focused configurations exist. For example, Momentree offers a pre‑lit Christmas Village Display Tree built on a modular tiered platform and supplied with pre‑decorated garland and decorative lighting.
What components are included with a Momentree Christmas Village Display Tree?
This pre‑lit configuration is built on a modular tiered platform and supplies Christmas‑specific decoration and lighting: pre‑decorated Christmas garland (green branches, red berries, pinecones) and decorative string lighting with 8 selectable modes. It’s designed for arranging miniatures and figurines across its tiers.
What should I look for when selecting a stand for my Christmas village display?
Favor multi‑level stability, a layout that supports your tallest buildings, good cord‑routing options, and indoor suitability. If you choose a modular product, review assembly instructions and weight guidelines before styling.
Can display trees be used for purposes other than Christmas villages?
Yes. A modular tiered platform can be restyled for weddings, desserts and cakes, floral décor towers, seasonal centerpieces, retail displays, and more—without changing the base platform’s core identity.
How should a modular display tree be stored and cared for after the holidays?
Dust with a soft cloth, keep the structure away from heat sources, and disassemble for flat‑pack storage in a dry area. Remove garlands and accessories before storage, and supervise children around the display during use.
Explore Related Guides & Resources
- Learn about the modular foundation behind themed configurations: Holiday Display Tree base platform
Sources & Trusted Research
- Lemax Collection – Small‑space composition, layering, and focal‑point guidance: https://www.lemaxcollection.com/village-journal/how-to-build-a-beautiful-village-in-a-small-space/
- Lemax Collection – When to add more buildings and when to stop: https://www.lemaxcollection.com/village-journal/when-to-add-more-buildings-and-when-to-stop/
- Lemax Collection – Lighting choices for depth and storytelling: https://www.lemaxcollection.com/village-journal/the-lighting-choices-that-change-everything/
- Lemax Collection – Create day & night mood: https://www.lemaxcollection.com/village-journal/how-to-create-day-and-night-mood-in-one-village-display/
- Department 56 – Beginner tips (hiding cords with snow and setup basics): https://www.department56.com/pages/start-collecting
- Department 56 – Scale/series FAQ (scale awareness when mixing): https://www.department56.com/pages/frequently-asked-questions
- HGTV – Editorial display ideas (mantel, bookshelf, tabletop): https://www.hgtv.com/lifestyle/holidays/christmas-village-display-ideas-pictures
- Sapcote Garden Centre – Power planning and tiered layouts: https://www.sapcotegc.co.uk/christmas-guides/how-to-display-a-lemax-village/
- Play Party Plan – Ladder “tree” village displays (DIY trend): https://playpartygame.com/christmas/beautiful-christmas-village-ladder-displays/
- CPSC – Holiday decoration safety: https://www.cpsc.gov/Safety-Education/Safety-Guides/Fire-Furniture-Furnishings-and-Decorations/Holiday-Decoration-Safety-Tips
- CPSC – Holiday safety center (connection guidance): https://www.cpsc.gov/Safety-Education/Safety-Education-Centers/Holiday-Safety
- NFPA – Winter holiday safety tips (turn off, indoor/outdoor use, heat clearance): https://content.nfpa.org/-/media/project/storefront/catalog/files/safety-tip-sheets/winterholidaysafetytips.pdf
- ESFI – Keep cords out of rugs/furniture pinch points: https://www.esfi.org/holiday-safety-tip-2-decoration-cords/
- QuakeHOLD! – Museum putty for securing collectibles: https://www.quakehold.com/product/quakehold-museum-putty/
- OSHA (general shelving stability principle) – Heavier low/central: https://www.osha.gov/warehousing/hazards-solutions
Note: All Momentree product facts in this guide come from Momentree first‑party materials and user manual content. External sources support general decorating and safety best practices only.


