 Black friday 75% Off:
Quick Answer: What Is a DIY Christmas Village Display?
A DIY Christmas village display is a self-planned miniature holiday scene built from collected or handmade buildings, figurines, and accessories. You choose the theme, layout, and base—anything from a tabletop with foam risers to a tiered stand—then add lighting, snow, trees, roads, and details. The best results come from simple planning: measure your space, sketch a layout, plan where power and wiring will go, and build in layers for depth.
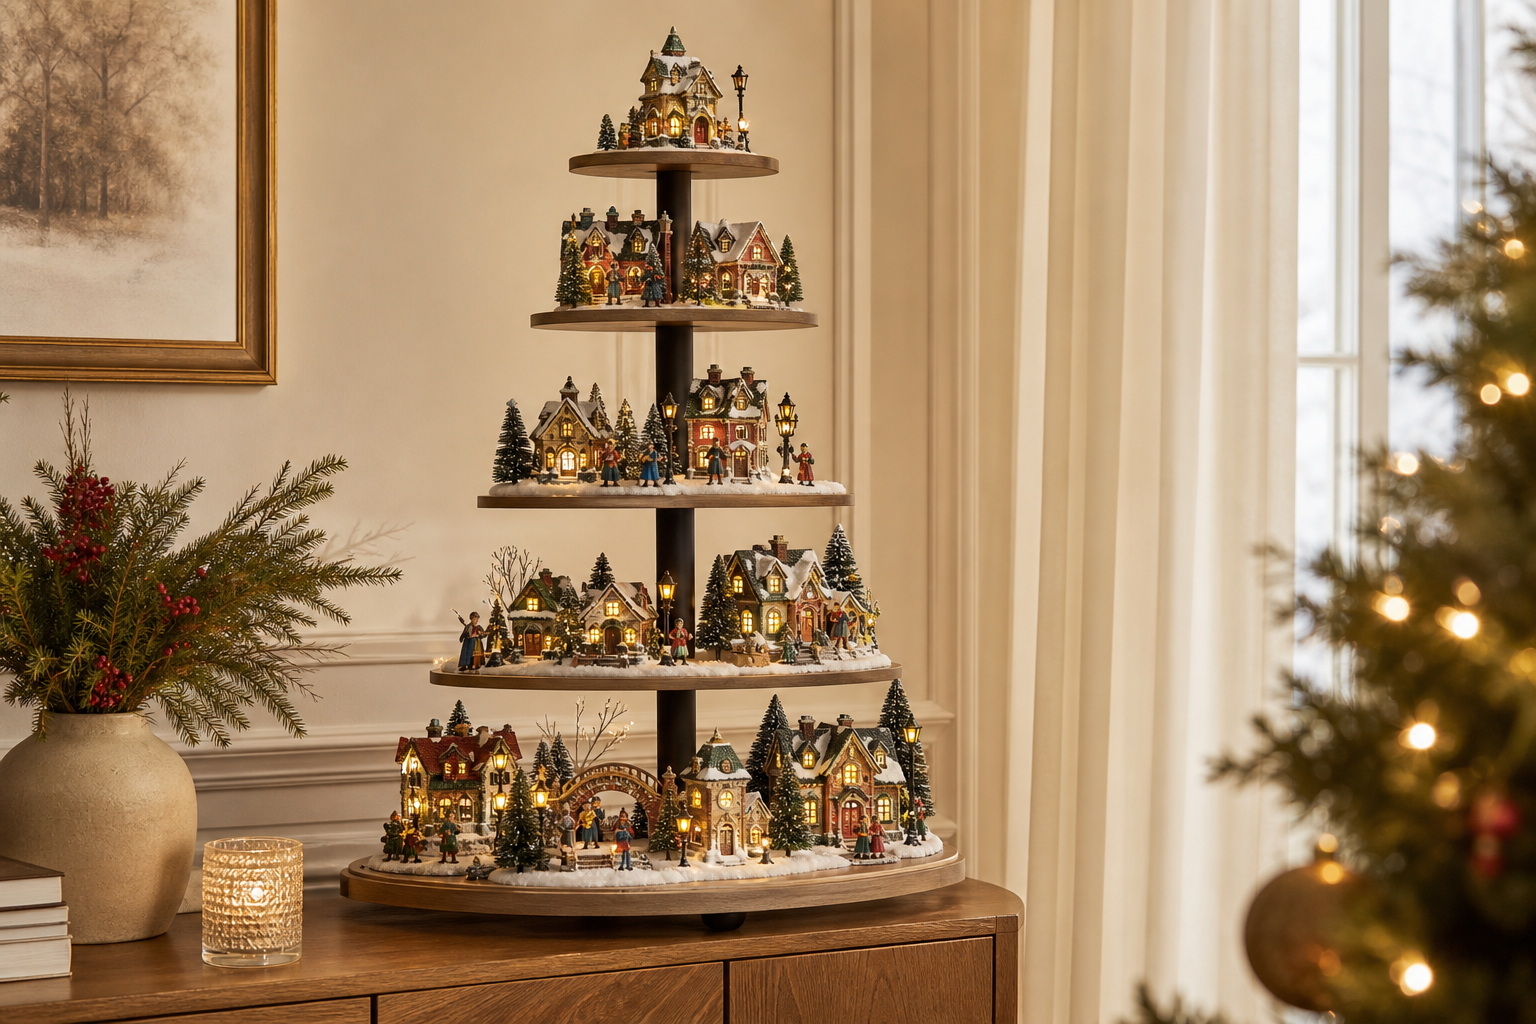
Key Takeaways for Your DIY Christmas Village Project
- Measure your space and pick a stable location with easy access to power.
- Choose a solid base; use risers or a tiered stand to add height and depth.
- Plan wiring early and test lights before covering cords.
- Lighting, elevation, and grouped scenes make the village feel cohesive.
- Modular tiered stands can simplify multi-tier layouts but are optional.
Essential Planning: Choosing Your Space and Base
Before you unbox a single house, decide where your display will live and how big it can be.
- Location ideas: mantels, bookcases, window ledges, sofa tables, dining buffets, dedicated corners, or a rolling sideboard. Keep traffic patterns in mind and avoid heat sources.
- Power and visibility: note outlet locations, whether a power strip will be hidden, and sight lines from typical viewing angles.
- Base options:
- Flat surfaces: a table or shelf lined with a snow blanket/felt.
- Custom platforms: plywood or MDF topped with rigid foam lets you carve hills and route cords through drilled passages.
- Tiered stands: a modular, multi-level stand can create instant elevation and clear tiers. Momentree’s Holiday Display Tree is a reusable six-tier platform with a black metal center structure, cross-shaped metal base, rolling wheels, and MDF tier boards with a wood‑grain finish. It can be configured with fewer tiers when needed. Modular solutions are helpful, not mandatory—choose what suits your space and style.
How to Plan Your Village Layout and Scene
Take a short planning pause before placing pieces.
- Sketch a quick map: mark where tall buildings, mid-size houses, trees, and streets go. Place taller items toward the back and smaller vignettes up front to preserve sight lines.
- Build depth with height: use foam blocks, books, or purpose-made risers to create gentle elevation changes. Hide edges with snow blankets or batting.
- Design pathways: connect scenes with roads or footpaths so the eye travels naturally. Group accessories that “belong” together.
- Plan lighting early: stage cord routes behind risers, pre-test building lights and accent LEDs, then conceal wiring under snow or fabric.
- Using tiers: a tiered base (such as Momentree’s Holiday Display Tree) naturally organizes foreground, midground, and background. If you prefer a Christmas‑specific configuration, see the example section below featuring the Christmas Village Display Tree – Pre-Lit.
DIY Materials and Tools You’ll Need
Use what fits your budget, space, and style. Always check product labels for compatibility and safety.
- Base and elevation: plywood or MDF sheet; rigid foam (XPS/EPS) sheets or blocks; premade risers; books/boxes as hidden lifts.
- Cutting/shaping: craft knife; foam-safe hot‑wire tool; drill (for cord pass‑throughs in wood/foam stacks).
- Ground cover: snow blankets/batting, faux snow scatter, felt, fabric backdrops.
- Adhesives/fasteners: wood glue and screws for wood; solvent‑free, foam‑safe adhesives (e.g., PVA/latex or dedicated foam glues) for polystyrene; painter’s tape or low‑tack tape for temporary positioning. Avoid solvent aerosols that can melt foam; spot‑test paints/adhesives on scrap.
- Lighting and power: UL/ETL‑listed indoor light strings, village accessory power supplies, extension cords, and power strips rated for your load. Follow each product’s instructions for maximum connections.
- Details: miniature trees, figurines, buildings, lampposts, signage, moss, gravel, and tiny props.
- Stabilizers: museum putty/wax for figurines and small lamps; felt pads under bases to protect furniture.
Step-by-Step: Setting Up Your DIY Christmas Village Display
1) Prep the base and backdrop
- Level your surface. Lay down a snow blanket or felt as the first layer. If you built a foam-over-wood platform, sand any rough edges and vacuum dust.
- Place a simple backdrop (fabric, poster board, or a photo panel) if your display sits against a wall.
2) Stage power and test lighting
- Position power strips where they’ll be hidden yet accessible. Test building lights and any accent LEDs before placing them.
3) Rough in elevation and main buildings
- Add risers/foam blocks to create back tiers and gentle hills. Place the tallest buildings first toward the rear, then mid-size pieces, then small scenes up front.
4) Route cords and refine placement
- Feed cords behind risers or through drilled passages. Tuck slack beneath foam and conceal with snow blankets. Check that paths/streets read clearly from normal viewing angles.
5) Add scenery and details
- Place trees in clusters, add fences, bridges, and signage. Use museum putty/wax sparingly to keep small accessories steady. Sprinkle faux snow to blend seams.
6) Lighting effects and final checks
- Aim accent lights for warm “evening” mood if desired. Dim room lights and make adjustments so important details aren’t shadowed. Confirm cords are secure and out of walkways.
Note on modular setups: If you’re using a tiered stand like Momentree’s Holiday Display Tree, assemble the structure vertically from the base by connecting the center support and adding display tiers progressively. You can configure the assembled height by choosing how many tiers to install. If you opt for the Christmas Village Display Tree – Pre-Lit, see the example section below for its Christmas‑specific components.
Momentree Expert Tip
- For evolving collections, plan your village as “zones” (town square, hillside cottages, market row). On a modular stand like the Holiday Display Tree, dedicate specific tiers to each zone so additions next year don’t disrupt the whole layout. The tier edges include holes that accept removable hooks—handy for attaching small ornaments or signage you design.
Expert Tips for a Standout Christmas Village
- Depth and realism: layer elevations subtly; keep taller pieces back. Group accessories thoughtfully and leave some negative space to avoid clutter.
- Stability first: heavier or fragile items belong on lower levels. Keep displays back from edges and away from high-traffic areas. Use museum putty/wax on small pieces and test on inconspicuous surfaces first.
- Safer lighting habits: use indoor‑rated, UL/ETL‑listed lights; don’t overload outlets; follow the connection limits printed on each light set; turn decorations off when sleeping or away.
- Plan cord routes early: never run cords under rugs or across walkways. Conceal with snow blankets, behind risers, or through platform pass‑throughs.
- Thinking ahead: if you plan to expand, a modular tiered stand can help you introduce new levels without rebuilding your base from scratch. It’s optional—choose what matches your style and storage.
Using Modular Tiered Stands: Momentree Christmas Village Display Tree Example
Modular, tiered stands support multiple display levels and can be reconfigured for different scenes. Within that approach, Momentree offers a Christmas‑specific option:
- Product identity: The Christmas Village Display Tree – Pre-Lit is a Christmas application built on Momentree’s Holiday Display Tree modular platform.
- Christmas configuration details: It supplies pre‑decorated Christmas garland with green branches, red berries, and pinecones, plus decorative string lighting with eight modes (Combination, In wave, Sequential, Slo glo, Chasing/flash, Slow fade, Twinkle/flash, Steady on).
- Structure and setup: It follows the Holiday Display Tree’s assembly logic—built vertically from the base by connecting the center support and adding tiers progressively. Marketing describes this configuration as “Easy to Set Up.”
- Where it fits: Use it when you want a ready-to-style, multi‑level base for villages. It’s one option among many DIY paths (flat platforms, foam risers, custom shelves)—choose what best fits your space, storage, and aesthetic.
FAQ: DIY Christmas Village Display Questions
Q: What is the best way to start planning a DIY Christmas village display?
A: Measure your space, choose a stable location with nearby power, sketch a simple layout (tall pieces in back, small scenes in front), and test lights and power runs before placing snow or décor.
Q: How do I create different levels for my Christmas village setup?
A: Stack rigid foam or premade risers beneath buildings to create hills and back tiers, then hide seams with snow blankets. Alternatively, use a modular tiered stand to create clear, multi‑level viewing without building a custom platform.
Q: What materials work best for building a homemade village base?
A: A wood sheet (plywood or MDF) topped with rigid foam is a popular combo: wood adds rigidity; foam lets you carve hills and route cords. Use foam‑safe, solvent‑free adhesives and latex/acrylic paints; spot‑test first to avoid melting foam.
Q: How can I add lighting to my Christmas village safely?
A: Use indoor‑rated, UL/ETL‑listed lights. Follow the connection limits on each set, avoid overloading outlets, and turn off displays when unattended or sleeping. Keep cords off walkways and never run them under rugs or through doors.
Q: Can I use a modular display stand for my village, and what are the benefits?
A: Yes. A modular stand provides defined tiers for foreground/midground/background and can be configured for different heights. Momentree’s Christmas Village Display Tree – Pre-Lit adds Christmas garland and decorative string lighting in eight modes as part of its configuration. Choose a modular route if it suits your style, storage, and setup preferences.
Q: What are some common mistakes to avoid when setting up a Christmas village?
A: Cluttered layouts, unstable bases, hidden or overloaded power strips, cords across walkways, and placing fragile pieces on high edges. Edit accessories, group related scenes, and secure small items.
Q: How should I store my display after the holidays?
A: Box buildings and figurines with padding, coil cords loosely, and label bins by scene. If you used a modular stand like the Holiday Display Tree, disassemble it for flat‑pack storage; remove garlands and accessories first and store the stand in a dry area.
Q: Are there tips for updating or expanding my display each year?
A: Add in zones: one new vignette per season keeps things cohesive. If using tiers, dedicate a level to new scenes. Keep a small kit of risers, snow blanket offcuts, and putty so tweaks are fast and stable.
Related Guides and Further Reading
- Explore modular tier options in our comprehensive guide to modular tiered display stands.
- Browse Christmas decorating inspiration with village scenes.
- See our step-by-step guide for assembling the Momentree Holiday Display Tree.
- Learn creative and safe lighting techniques in lighting and effects for holiday displays.


