 Black friday 50% Off:

Quick Start: What is a DIY Christmas Village Display?
A DIY Christmas village display is a miniature winter scene you plan and assemble at home using buildings, figurines, trees, and snow effects. Popular formats include flat tabletops, raised platforms, and multi-level tiered or “tree-style” stands. You can build from basic craft materials or use a modular system to create vertical tiers—choose the approach that fits your space, style, and skill.
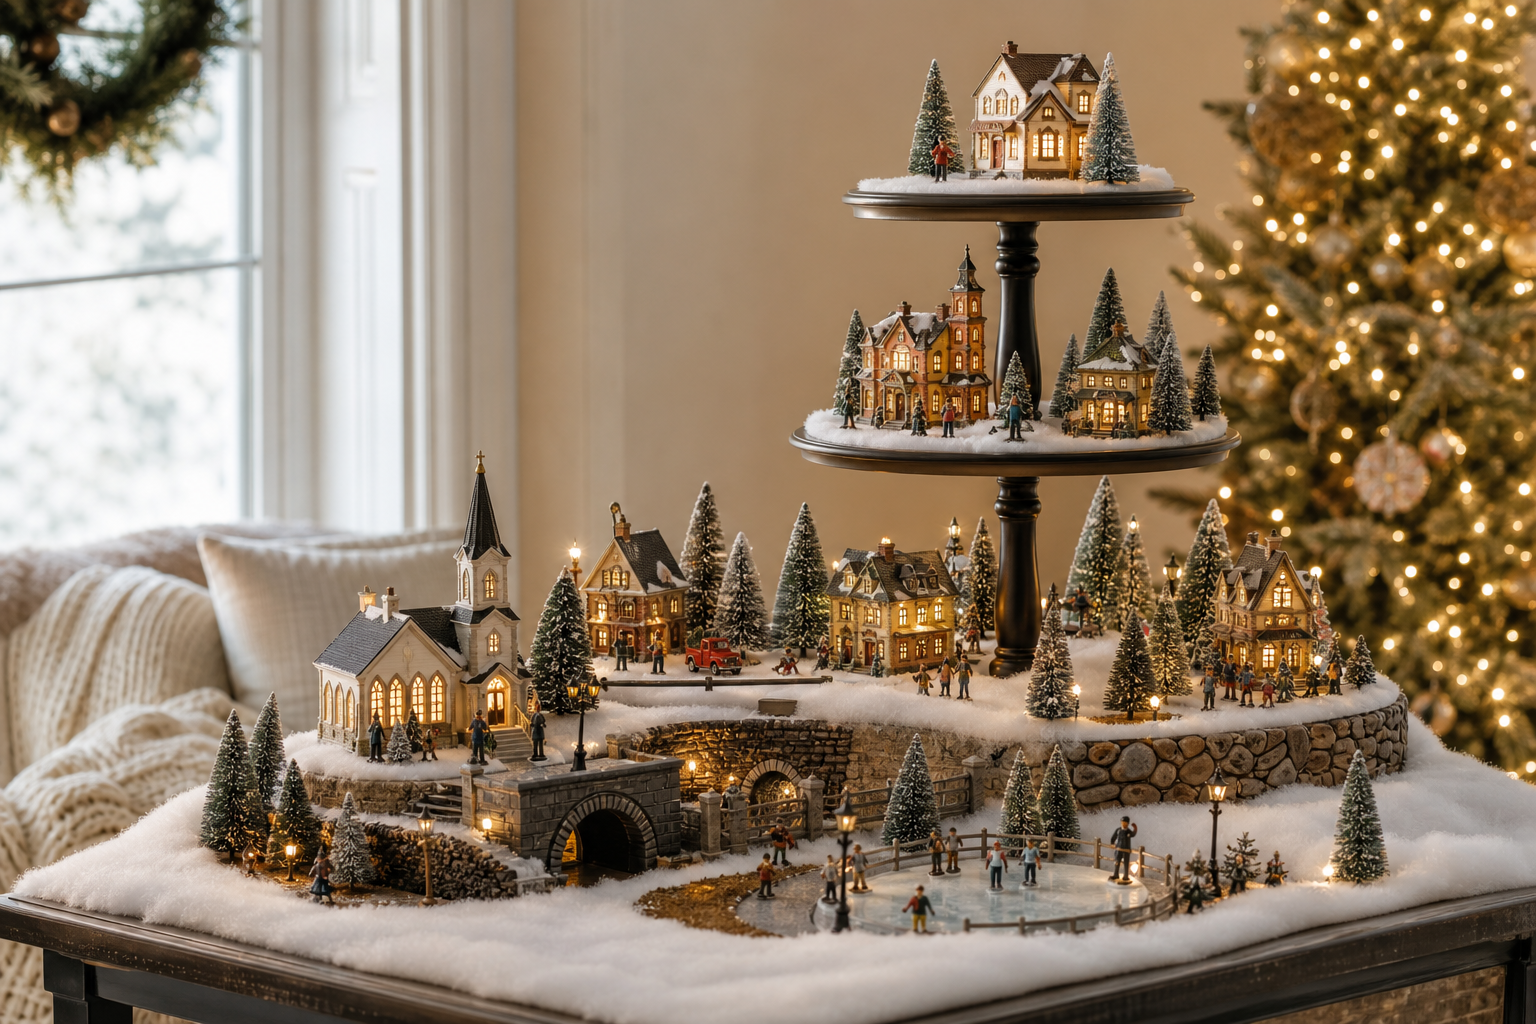
Entity clarification
A “Christmas Village Display” is the general practice of arranging miniature holiday scenes. It does not require any single brand, stand, or product. Modular/tiered systems are one option among many.
Planning Your Christmas Village: Key Decisions
Before you buy supplies or unbox buildings, make a quick plan:
- Location and visibility: Decide where the village will live (mantel, console table, bookshelf, dining buffet, window niche, or a dedicated platform). Ensure sightlines from typical viewing angles.
- Measure your space: Length, depth, and nearby outlet locations guide your layout and lighting plan. Sketch a simple top-down layout with rough building footprints.
- Choose a display format: Flat tabletops are quick and classic; raised platforms improve depth; tiered or tree-style displays maximize vertical storytelling and viewing.
- Stability and safety: Keep heavy pieces on stable surfaces, leave clearance from heat sources, and plan cord runs before you decorate.
- Lighting plan: Confirm outlet access and decide between plug-in or battery lights. Identify where adapters or cords will be concealed.
Key Takeaways
- Start with size, location, and power access, then pick a format: flat, platform, or tiered/tree.
- Build elevation with foam risers or a sturdy platform; hide cords under snow blankets and behind the scene.
- Use foam-safe adhesives and test on offcuts; avoid high heat and solvent glues on polystyrene foams.
- For vertical builds, you can DIY with wood/foam or use a modular tiered stand designed for multi-level displays.
- Follow lighting safety: use listed indoor products, don’t overload cords, and turn off displays when unattended.
Gathering Materials and Tools
Here’s a versatile list you can adapt to your style and budget.
Common base and terrain materials
- Rigid foam (EPS/XPS) sheets or blocks for risers and hills
- Plywood/MDF board for a liftable platform with risers
- Cardboard or nested boxes for quick elevation
- Snow blanket/batting (polyester is common and often labeled flame retardant—check the specific product label)
- Plaster cloth for hard-shell terrain over foam (optional for advanced builds)
- Scenic materials: acrylic paint, ground cover, faux trees, backdrops
Adhesives and fasteners
- Foam-safe options: PVA/white glue, specialty foam tack, or low-temperature hot glue suitable for foam
- Pins/foam nails, toothpicks, or clips to hold risers while curing
- Museum putty or tacky wax to steady lightweight figures
- Avoid solvent-based adhesives and high-temperature hot glue on polystyrene foams
Tools and layout helpers
- Utility knife; hot-wire foam cutter for clean foam shaping (use safely and per instructions)
- Ruler/tape measure, straightedge, cutting mat
- Brushes/rollers, disposable gloves
- Cable clips/ties, multi-output accessory cords (follow brand instructions), timers
Optional: modular/tiered systems
- For multi-level scenes, consider a purpose-built modular stand to create vertical tiers without custom carpentry.
Step-by-Step: Building a Tabletop or Platform Display
Follow these steps for a classic flat or raised layout.
- Prepare the base
- Wipe the surface clean. If using a platform, cut/finish your board and add non-scratch pads beneath.
- Add risers: stack foam blocks/boxes where you want hills or balconies; pin or glue as needed.
- Test-fit the layout
- Place taller buildings toward the back, medium in the middle, small accessories and roads up front.
- Adjust spacing so doors/paths are visible and figurines have clear sightlines.
- Manage power early
- Identify the outlet and route cords to the back or down through gaps in the base.
- Consolidate with listed multi-output cords or adapters as appropriate; label plugs for easy teardown.
- Dress the terrain
- Drape a snow blanket/batting to soften riser edges and hide wiring.
- Optional: for realistic slopes, carve foam and cover with plaster cloth before painting and adding scenic textures.
- Place buildings and accessories
- Set structures on stable surfaces; use museum putty for small/light pieces.
- Add trees, fences, and figurines to build depth and story.
- Light safely
- Use indoor-rated, listed products (look for marks from recognized testing labs).
- Don’t overload cords or power strips; follow the manufacturer’s limits. For incandescent mini-lights, many safety guides cap end‑to‑end connections at about three strings—check your product label.
- Keep cords visible (not under rugs) and turn off displays when sleeping or away.
Step-by-Step: Creating a Tiered or Tree-Style Display
Vertical displays boost visibility and let you compose scenes on multiple levels.
Why go vertical?
- Clear views of buildings and vignettes from different angles
- More story layers in the same floor or tabletop footprint
- A striking focal point for mantels, corners, or entryways
DIY vertical methods
- Foam terraces: Build stepped risers from rigid foam; carve edges, then cover with snow blanket or plaster cloth.
- Wood platform stacks: Attach risers under a plywood/MDF top; add smaller upper platforms for multiple levels.
- Modular/tiered stands: Purpose-built structures with stacked circular tiers to stage buildings and accessories.
Build sequence (tiered/tree-style)
- Choose the structure: DIY terraces/stacked platforms or a modular stand.
- Map power: Plan where cords drop between levels and where adapters live.
- Test-fit from top to bottom: Place the most delicate pieces on upper tiers; heavier pieces on lower tiers.
- Route and secure cords: Use clips/ties along the back or center; leave slack for removal.
- Add snow/greenery: Drape blankets or add seasonal trim around edges without blocking ventilation for adapters.
- Finalize details: Stage trees, figurines, and street elements; step back and balance color/height.
How the Momentree Christmas Village Display Tree Works
The Christmas Village Display Tree – Pre-Lit is a Christmas-focused configuration of the Momentree Holiday Display Tree base platform. It keeps the modular structure and adds Christmas-specific decoration and lighting for village scenes.
- Structural base (inherited from the Holiday Display Tree): six round display tiers supported by a black metal center structure, set on a cross-shaped metal base with rolling wheels.
- Christmas configuration: tiers are supplied pre-decorated with Christmas garland featuring green branches, red berries, and pinecones.
- Pre-lit: decorative string lighting with 8 selectable modes (Combination, In wave, Sequential, Slo glo, Chasing/flash, Slow fade, Twinkle/flash, Steady on).
- Assembly and storage: follows the base platform’s vertical assembly logic; the stand can be disassembled for storage.
- Brand positioning: described as Easy to Set Up.
Learn more or see images: Christmas Village Display Tree – Pre-Lit.
Styling and Arranging Tips for a Lifelike Village Scene
- Layer for depth: Tallest buildings to the back/upper levels, mid-size in the middle, small shops, markets, and figures up front.
- Create streets and sightlines: Angle buildings to form lanes and plazas; leave negative space so scenes feel walkable.
- Vary tree heights and density: Cluster evergreens and add a few bare trees for contrast.
- Build a story: Stage related vignettes—carolers near the church, skaters by the pond, a market beside the town square.
- Use light for drama: Hide adapters, soften with snow drape, and add warm accent lights to highlight focal pieces.
- Backdrops and edges: Add a winter sky print or window frost film behind the display; trim edges with snow drape for a polished finish.
Momentree Expert Tip: Test-fit your tallest building and any animated pieces first, then design paths and lighting around those anchors. This avoids re‑wiring after you’ve dressed the scene.
Care, Storage, and Safety Considerations
- General cleaning: Dust stands and tiers with a soft cloth. Avoid soaking decorative elements; spot-clean gently.
- Disassembly and storage: If using a modular stand, follow the product instructions to disassemble for flat-pack storage and keep components in a dry area. Remove any loose accessories you added before storing the stand.
- Electrical safety:
- Use indoor-rated, listed lights/cords and inspect for damage before each season.
- Do not overload extension cords or power strips; follow manufacturer limits and avoid daisy-chaining.
- Keep cords off walking paths and never run them under rugs or furniture.
- Turn off decorations when sleeping or away, or use a timer.
- Many authorities note holiday lighting is temporary (often limited to about 90 days)—follow local codes and manufacturer guidance.
- Heat and placement: Keep displays away from open flames, high heat, and unventilated adapters. Supervise children around multi-level stands and delicate pieces.
Frequently Asked Questions: DIY Christmas Village Displays
What materials are best for building a DIY Christmas village display?
Rigid foam risers, plywood/MDF platforms, polyester snow blankets/batting, and plaster cloth (optional) are common. Use foam-safe adhesives and pins/clips during assembly, then finish with paint, faux trees, and ground cover.
How do I light up my Christmas village safely?
Use indoor-rated, listed products; inspect sets for damage; don’t overload cords or power strips; avoid running cords under rugs; and turn off lights when unattended. For incandescent mini-lights, many safety guides limit about three strings end‑to‑end—always follow your product’s label.
What are creative ways to add elevation or layers to my Christmas village?
Stack foam risers, build stepped wooden platforms, or use a modular tiered stand. Place taller buildings at the back/upper levels and create streets and plazas with angled placements.
How can I store my Christmas village display after the holidays?
Remove loose accessories, coil labeled cords, and keep fragile items in padded containers. If you used a modular stand, disassemble per instructions and store flat in a dry area.
What is a tiered Christmas village display and how is it different from a flat platform?
A tiered display uses multiple levels to showcase scenes vertically, improving visibility and storytelling. A flat platform is a single level—quick to set up but with less vertical layering.
Do I need a special stand to build a Christmas village tree?
No. You can DIY multi-level structures with foam or wood. A modular tiered stand is an optional way to get stable, repeatable tiers without custom carpentry.
How do I keep small village pieces stable on multi-level displays?
Use museum putty/tacky wax for figurines, ensure flat surfaces for buildings, and avoid placing heavy items near edges. Secure cord runs with clips/ties.
Are there ready-made modular systems for Christmas village setups?
Yes—modular tiered stands exist for multi-level displays. One example is Momentree’s Christmas Village Display Tree – Pre-Lit, which combines a tiered structure with Christmas decoration and lighting.
Related Guides
- Explore the modular category: Modular Tiered Display System
- See the base platform: Holiday Display Tree
Sources and Further Reading
- How to set up and display a Lemax village (bases/risers, layout, cord hiding) – Sapcote Garden Centre: https://www.sapcotegc.co.uk/christmas-guides/how-to-display-a-lemax-village/
- NMRA Beginners Guide: Scenery (foam layering and plaster cloth): https://www.nmra.org/beginners-guide-part-6-scenery
- Woodland Scenics Terrain/Layout Systems (foam risers, plaster cloth): https://woodlandscenics.woodlandscenics.com/show/category/LayoutSystems
- Plaster Cloth instructions (overlap to form hard shell) – Woodland Scenics: https://scenearama.woodlandscenics.com/instructions/SP4113inst.pdf
- Adhesives and foam-safe guidance – Maker Spaces Knowledge Base: https://ms-kb.msd.unimelb.edu.au/msdmaker/msd-model-making-space/hand-model-making/adhesives
- Polyester snow blanket example (check labels) – Menards Buffalo Snow: https://www.menards.com/main/holiday-decorations/christmas/christmas-village/original-buffalo-snow-trade-45-x-99-snow-blanket/b00632/p-1444451034432-c-12296.htm
- Department 56 Start Collecting (multi-bulb cords, snow to hide cords): https://www.department56.com/pages/start-collecting
- NFPA Winter Holiday Safety Tips: https://content.nfpa.org/-/media/project/storefront/catalog/files/safety-tip-sheets/winterholidaysafetytips.pdf
- CPSC Holiday Decoration Safety Tips: https://www.cpsc.gov/s3fs-public/611.pdf
- CPSC Extension Cords Safety Alert: https://www.cpsc.gov/s3fs-public/5032.pdf
- ESFI Holiday Electrical Safety: https://www.esfi.org/news/avoid-serious-electrical-and-fire-hazards-decorating-your-home-this-holiday-season/
- UL Solutions – Safe lighting tips: https://www.ul.com/news/safe-lighting-tips-keep-season-bright


