 Black friday 50% Off:
Quick Answer: What Is a Christmas Village Display?
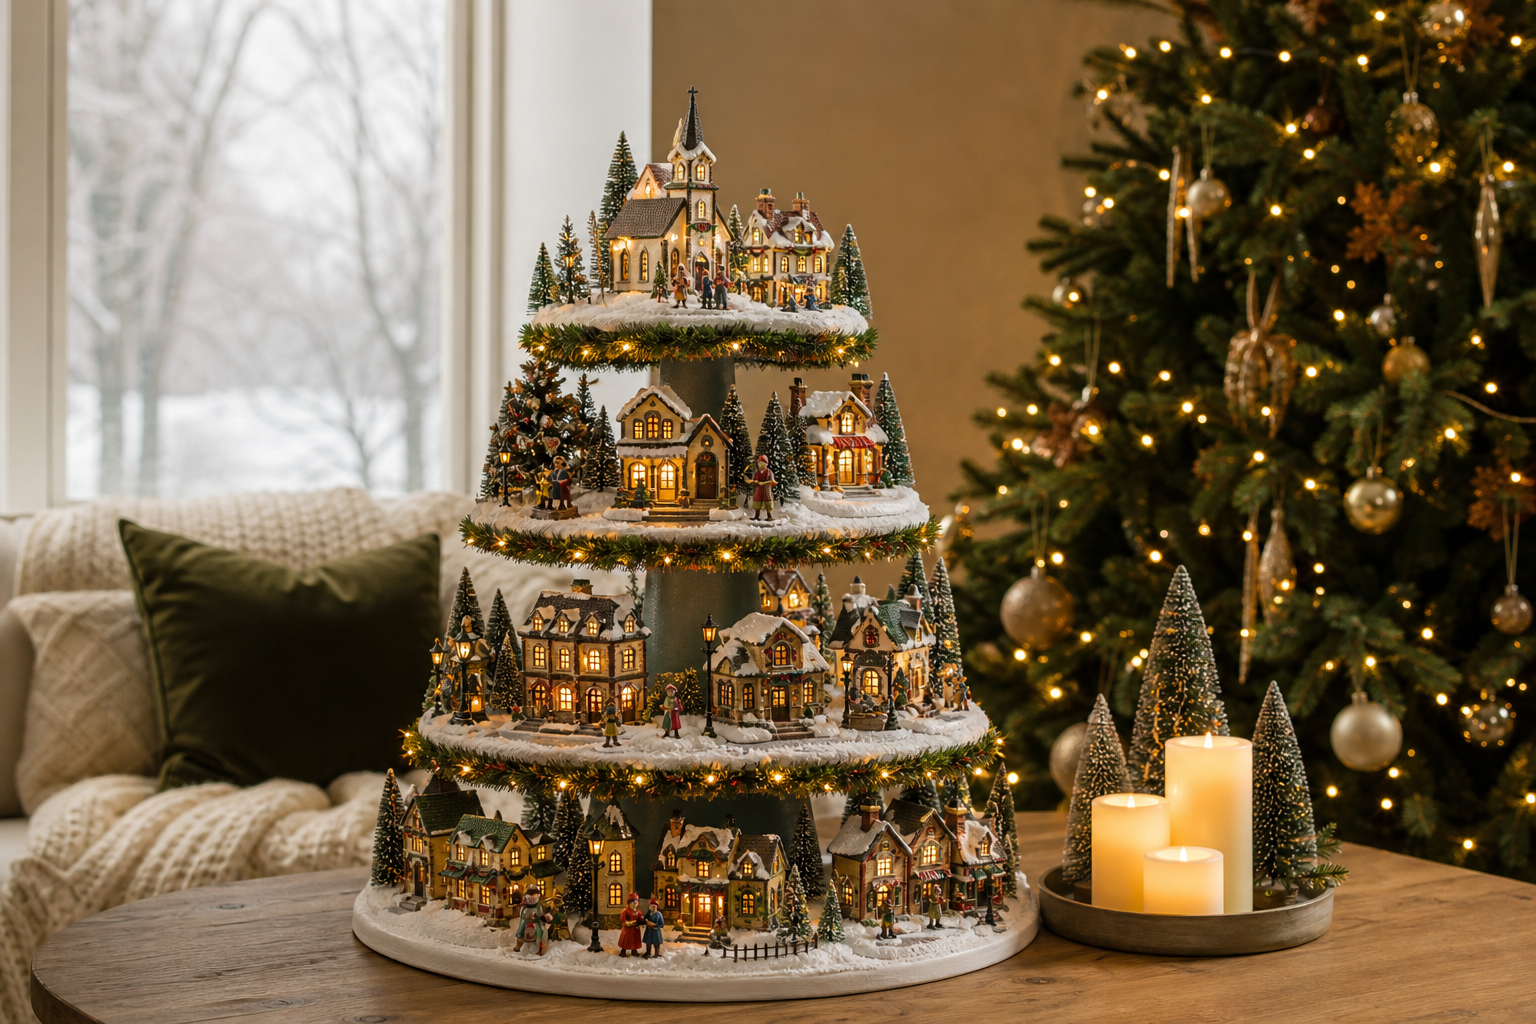
A Christmas village display is a curated arrangement of miniature buildings, figures, and seasonal elements that together tell a holiday story. People build them on tables, shelves, or dedicated multi-tier stands, using lighting, faux snow, and trees to create depth and atmosphere. The appeal is part nostalgia, part creativity—bringing a cozy, detailed winter scene into your home.
Key Takeaways
- Start with a theme and a few focal buildings, then layer smaller pieces toward the front for clear sightlines.
- Tables, shelves, and dedicated tiered stands each work; choose based on space, stability, accessibility, and the look you want.
- Elevation (risers or multi-level stands), lighting, and open negative space make scenes read as a real place rather than a parts shelf.
- Plan cord routes early, use UL-listed decorative lighting, and secure lightweight pieces with removable putty or dots.
- A purpose-built multi-tier stand can simplify layered layouts; Momentree’s Christmas Village Display Tree is a pre-lit, pre-decorated example made for village scenes.
Core Elements of a Christmas Village Display
A successful village is built from a few consistent building blocks found across popular hobby references:
- Structures and figures: houses, churches, shops, and civic buildings paired with figurines (people and animals).
- Landscape and scene-makers: bottle-brush or evergreen trees, lampposts, benches, fences/walls, bridges, roads/paths, signage, and backdrop elements.
- Groundcover and elevation: snow blankets/batting, loose faux snow, foam risers and bases for hills and layered streets.
- Power and lighting: building adapters, multi-plug systems, and accent lights (streetlamps, lighted ponds) to establish mood and guide the eye.
- Securing aids: tacky wax, museum putty, or removable adhesive dots to keep lightweight items upright on smooth surfaces.
Visual storytelling tips:
- Pick a theme (e.g., Dickens street, snowy market). Choose 1–2 focal buildings and balance height from back to front and left to right.
- Leave breathing room. Group accessories in purposeful clusters and avoid crowding façades with tall trees.
- Use roads, bridges, and tree lines to create a natural flow so the viewer’s eye travels through the scene.
Planning Your Display: Tips and Layout Strategies
- Measure your space: Whether it’s a dining table, console shelf, corner credenza, or a dedicated stand, note width, depth, and nearby walkways.
- Sketch before placing: Roughly draw tiers or sections. Mark where cords might drop and where taller buildings should go.
- Think in layers: Taller buildings toward the back or on higher levels; smaller structures and figures near the front to keep sightlines clear.
- Map the streets: Decide where roads/paths will connect scenes, and plan tree lines or fences as gentle visual borders.
- Test lighting early: Evaluate in daylight and in dimmer evening conditions; adjust when two features compete for attention.
- Pre-plan cord management: Route cords behind risers or through channels cut in foam, then hide with snow layers.
Real-World Application: A compact Dickens street on a console
- Elevate the rear: Add a foam riser or back tier so tall buildings sit higher than the front row.
- Set anchors first: Place two standout buildings at the rear left and right; add a mid-height piece in between.
- Draw the street: Lay a narrow “cobblestone” path down the middle with a thin road mat or stippled snow.
- Frame, don’t block: Flank façades with taller evergreens to create a vignette without hiding windows and doors.
- Light the scene: Add lampposts along the path and test the glow in evening light; edit if a single piece overwhelms the scene.
Choosing the Right Display Surface: Tables, Shelves, and Stands
Selecting the right surface shapes how easily you can layer, light, and access your village. Use the quick comparison below to match a surface to your goals.
| Surface Type | Advantages | Considerations | Best For |
|---|---|---|---|
| Dining/side tables | Generous width; easy to gather around | Requires seasonal takeover of furniture; cords need routing | Larger scenes; centerpiece displays |
| Shelves/mantels | Eye-level viewing; great for narrow rooms | Limited depth; more cord planning; benefit from simple risers | Slim, linear villages; small apartments |
| Custom boards/foam bases | Pre-shaped layers; easy to carve cord channels | Storage space off-season; requires crafting time | Scenic hills, tunnels, bridges |
| Dedicated multi-tier stands | Built-in vertical layers and levels; 360° viewing potential | Choose a design that fits your space and access needs | Multi-level, showcase-style villages |
Where a dedicated multi-tier stand helps:
- Built-in levels create natural back-to-front depth for buildings and trees.
- Round or radial tiers (depending on the stand) can allow walk-around viewing and creative street layouts.
- Consider access for placing buildings and plugging cords; verify stability and safe indoor placement.
Arranging and Styling Your Christmas Village Scene
- Layering for depth: Place taller structures toward the rear or higher levels; foreground figures add scale and storytelling.
- Balance and rhythm: Mirror height loosely left-to-right; leave intentional gaps so scenes feel like places, not rows.
- Lighting strategy: Use building lights plus lampposts or accent pieces to separate scenes and set mood; evaluate under day and night conditions.
- Cord management: Plan routes behind risers or through foam channels before adding snow. Keep plugs and controls accessible—don’t bury them permanently.
- Snow and finishing: Use batting or mats to hide seams and cables; sprinkle loose faux snow last for a natural finish and to conceal cuts in foam.
- Safety and stability: Use tacky wax or removable dots for lampposts and figures. Keep displays level and away from open flames or high heat. Use UL-listed decorative lighting indoors and follow manufacturer instructions.
Showcase Solutions: Spotlight on the Momentree Christmas Village Display Tree
The Momentree Christmas Village Display Tree – Pre-Lit is a productized Christmas configuration built on the Holiday Display Tree platform. It retains the modular structure while adding Christmas-specific decoration and lighting for a ready-to-style multi-level village.
What it is and how it’s built:
- Platform relationship: A Christmas-focused configuration of the reusable Holiday Display Tree.
- Structural foundation: Six round display tiers supported by a black metal center structure and a cross-shaped metal base; the base includes rolling wheels. The stand uses powder-coated metal accessories. The assembled height can be configured by choosing how many tier modules you install.
- Christmas configuration: Pre-decorated tiers with Christmas garland featuring green branches, red berries, and pinecones, plus decorative string lighting.
- Lighting modes: Eight options are presented in supplied materials—Combination, In wave, Sequential, Slo glo, Chasing/flash, Slow fade, Twinkle/flash, and Steady on.
- Assembly logic: Built upward from the base by connecting center sections and adding tiers progressively. Marketing materials describe it as easy to set up.
- Intended use: Made specifically to support multi-level Christmas village scenes with miniature buildings and figures.
Explore the product page: Christmas Village Display Tree – Pre-Lit
Usage notes:
- Use indoors or in covered outdoor areas. Supervise children around the structure. Do not exceed weight guidelines for the stand.
Expert Tips: Creating an Eye-Catching Christmas Village
- Give height a job: Even on shallow shelves, a raised back row or a multi-level stand keeps façades visible and creates natural “streets.”
- Mix traditions and innovations: Pair classic buildings with fresh accessories (bridges, signage, lighted ponds) to renew your scene each year.
- Edit boldly: If a piece steals focus from your intended centerpiece, relocate it or dim its lighting effect.
- Refresh yearly: Rotate accents (trees, benches, lampposts) and vary road paths to change the story without replacing core buildings.
- Care basics: Dust gently with a soft cloth and keep snow materials away from heat sources. Store loose snow and small accessories in labeled containers.
Momentree Expert Tip
Using a Momentree stand for villages? Build only as many tiers as you need to tailor the height and viewing angles. After the season, remove garlands and accessories, disassemble for flat-pack storage, and store the stand flat in a dry area. Always supervise children around the structure and keep it away from open flames or high heat.
Frequently Asked Questions
What are the best surfaces for setting up a Christmas village display?
Any stable, level indoor surface can work—tables for larger scenes, shelves/mantels for narrow rooms, and dedicated multi-tier stands for built-in elevation and potential 360° viewing. Custom foam boards or risers help create hills and cord channels regardless of the base surface.
How do I keep my Christmas village display safe from children and pets?
Choose a sturdy, level surface; keep displays away from open flames and high heat; secure small items with tacky wax or removable dots; and supervise children around the setup. Route cords safely behind risers or through foam channels and keep plugs accessible.
Can I use lighting in my Christmas village scene, and what options work best?
Yes. Building lights, lampposts, and accent pieces create mood and help separate scenes. Test your arrangement in daylight and evening conditions, and use UL-listed decorative lighting indoors per manufacturer instructions. Avoid overloading outlets or daisy-chaining beyond device limits.
What are creative ways to add height or dimension to a Christmas village display?
Use foam risers or a back platform for rear buildings, cluster tall trees to frame vignettes, and consider a multi-tier stand to create natural layers. Keep smaller structures and figures at the front to preserve sightlines.
How should I store my Christmas village pieces and display between holidays?
Allow pieces to cool before packing, coil cords neatly, and store accessories in labeled containers. If you use a tiered stand, remove decorations and accessories, disassemble the stand, and store it flat in a dry area.
Does the Momentree Display Tree support other seasonal displays besides Christmas?
Yes. The Holiday Display Tree is a reusable modular platform that can be configured for different approved applications throughout the year, including weddings, birthdays, drinks/cocktail towers, retail displays, seasonal centerpieces, and floral décor.
What is included with a dedicated Christmas Village Display Tree?
For Momentree’s Christmas Village Display Tree – Pre-Lit, the configuration includes pre-decorated Christmas garland and decorative string lighting with eight selectable modes. It uses the same modular base platform with six round tiers and a black metal center structure. Refer to the product page for full package details.
How can I create a Christmas village display in a small space?
Focus on one street or square, elevate the back row with a slim riser, use shorter buildings up front, and keep accessories in tight clusters. A compact multi-tier stand can deliver layered viewing without needing a deep tabletop.
Related Guides and Resources
- See our guide to tiered display stands for multi-level layouts.
- Explore an overview of the modular holiday display platform to understand how one stand supports many applications.
- Browse seasonal display inspiration for ideas you can adapt to your village.
Sources and Further Reading
- Department 56 – Start Collecting: https://www.department56.com/pages/start-collecting
- Department 56 Blog – How to Display Department 56 Collectibles: https://www.department56us.com/blog/how-to-display-department-56-collectibles-villages-ornaments-angel-figurines-amp-decorative-40.html
- Lemax Village Journal – How to Start Your First Lemax Village Without Overthinking It: https://www.lemaxcollection.com/village-journal/how-to-start-your-first-lemax-village-without-overthinking-it/
- Lemax Village Journal – The Lighting Choices That Change Everything: https://www.lemaxcollection.com/village-journal/the-lighting-choices-that-change-everything/
- Lemax Village Journal – The Biggest Beginner Mistakes and How to Avoid Them: https://www.lemaxcollection.com/village-journal/the-biggest-beginner-mistakes-and-how-to-avoid-them/
- Lemax Village Journal – How to Build a Beautiful Village in a Small Space: https://www.lemaxcollection.com/village-journal/how-to-build-a-beautiful-village-in-a-small-space/
- My French Twist – Building a Christmas Village Display: https://www.myfrenchtwist.com/building-a-christmas-village-display/
- Michaels Project – Tiny Treasures Mini Christmas Village (removable Glue Dots): https://www.michaels.com/project/mini-village-de-no%C3%ABl-en-plein-air-tr%C3%A9sors-minuscules-B_90005
- UL Solutions – Safe Lighting Tips to Keep the Season Bright: https://www.ul.com/news/safe-lighting-tips-keep-season-bright
- UL Standards & Engagement – Holiday Decorating Safety Tips: https://ulse.org/news/ul-standards-engagement-standards-matter-holiday-decorating-safety-tips-take-time-prevent-fire-and/


