 Black friday 50% Off:

Quick Answer: What Are Christmas Village Platforms, Bases & Risers?
Christmas village platforms and bases are the foundational surfaces your miniature buildings and scenery sit on—often flat “snow” bases or shaped landscapes. Risers are blocks, steps, or plinths used to lift pieces for multi‑level views. Common materials include polystyrene foam, MDF/wood, plastic, and metal frames. You can DIY with foam and boards, buy pre‑made sets, or choose specialty multi‑tier stands designed for village scenes.
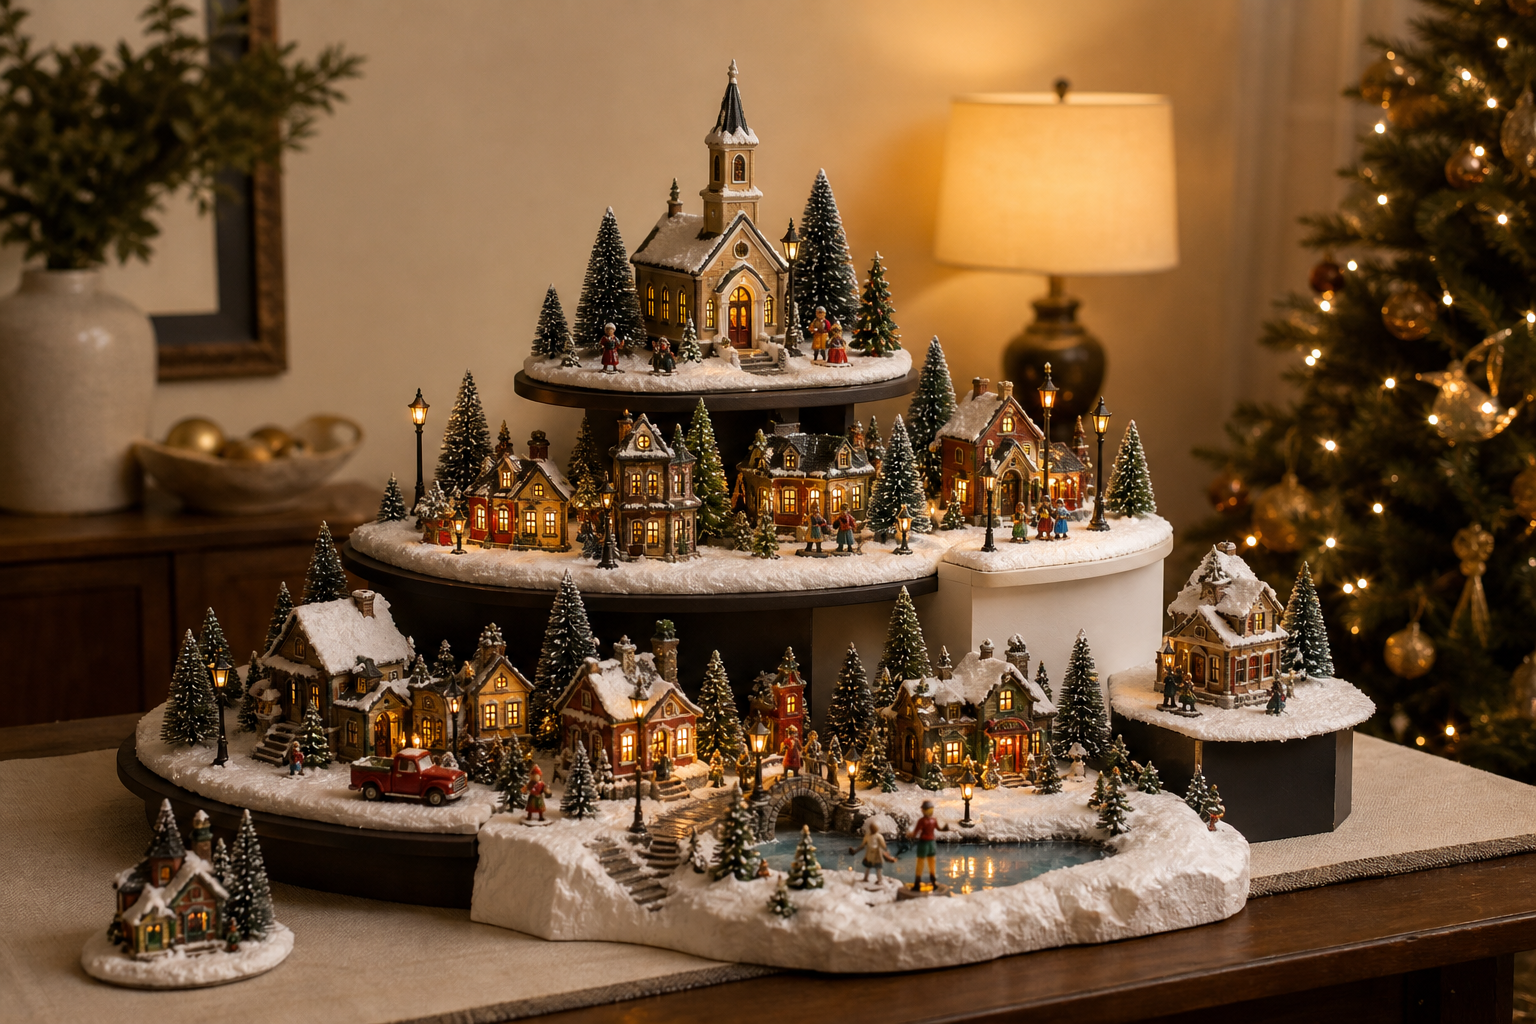
Key Takeaways: Choosing and Using Christmas Village Platforms
- Material and shape drive the look, stability, and cord‑management options of your display.
- DIY, ready‑made, and specialty platforms each have tradeoffs—pick based on space, style, and effort.
- Size your base to your buildings, planned roads/rivers, and safe cord routing—not just to shelf width.
- Tiered specialty stands (such as Momentree’s Christmas configuration) provide multiple display levels with integrated seasonal décor.
Types of Christmas Village Platforms, Bases & Risers
Flat bases and snow platforms
- Purpose: Provide a clean “ground” for a village scene and a place to hide cords beneath edges or through cutouts.
- Typical forms: Pre‑made snow‑textured panels or sheets; DIY boards topped with snow blankets; foam panels you can carve to add terrain.
Tiered platforms and multi‑level bases
- Purpose: Add vertical depth so back‑row buildings and focal pieces remain visible.
- Typical forms: Stacked shelves/steps, modular tiered stands, or layered foam to create gradual slopes or cliffs.
Risers and plinths
- Purpose: Elevate select items—like a church or town hall—above the rest. In display and visual‑merchandising language, a “riser” is a block, cube, or step that lifts objects for visibility.
- Typical forms: Foam blocks, wood cubes, clear acrylic risers, or carved scenic risers used under snow or landscaping.
DIY vs. manufactured options
- DIY: Foam sheets (EPS/XPS) or boards cut and stacked; MDF/plywood bases; hand‑carved terrain; painted and snow‑blanketed surfaces.
- Manufactured: Pre‑molded foam “snow” platforms, modular riser sets, and multi‑tier stands designed for collectibles and villages.
Shapes and sizing across the market
- Shapes: Rectangular and L‑shaped shelf fits, corner units, round/oval centerpieces, and tree‑like multi‑tier columns.
- Sizing: From small shelf vignettes to larger tabletops. Multi‑tier structures concentrate vertical display in a compact footprint.
Design Considerations: Size, Material & Display Stability
Right‑sizing your base
- Map your buildings and features on paper first. Add room for roads, rivers, and foreground figurines.
- Leave a perimeter for cord routing and a discreet spot to access a power strip or switched extension.
- Check clearances above and around the display (window treatments, shelves, doorways) and plan sight lines from typical viewing heights.
Material pros and cons (at a glance)
| Material | Advantages | Considerations | Common Uses |
|---|---|---|---|
| Foam (EPS/XPS/Polyiso) | Lightweight; easy to cut/shape; stackable for terrain | Use foam‑safe adhesives; ventilate when hot‑wire cutting; protect edges from dings | DIY bases, risers, carved hills |
| MDF (engineered wood) | Smooth, paintable surfaces; stable thickness | Heavy; fine dust when machined; moisture‑sensitive unless sealed | Flat bases, platforms, backer boards |
| Plywood / Solid wood | Better fastener holding; resists sag vs. MDF (not waterproof) | Weight varies; wood movement with humidity | Strong bases, stepped platforms |
| Acrylic / Clear plastic | Transparent risers keep sight lines open; light weight | Scratches easily; avoid ammonia/alcohol cleaners | Feature risers, museum‑style lifts |
| Metal frames/stands | Durable structure; slim profiles | Typically paired with separate shelves/tiers | Modular tiered display systems |
Evidence notes: Building‑science and DIY sources distinguish EPS/XPS/Polyiso foams; shop safety guidance calls for ventilation during hot‑wire cutting; MDF produces fine dust and is moisture‑sensitive; acrylic requires gentle, acrylic‑safe cleaning.
Stability and safety fundamentals
- Level and sturdy: Place your scene on a stable, level surface. Keep heavier items on lower levels; anchor tall furniture if children are present.
- Non‑slip layers: Shelf/liner material under objects can add grip and reduce sliding or vibration.
- Cord safety: Use UL‑listed lights; don’t overload outlets or daisy‑chain extensions; avoid running cords under rugs/doorways; inspect for damage.
- Heat and clearance: Keep decorations and cords away from heat sources. Favor LED light sets that run cooler.
Lighting, garland and décor compatibility
- Pre‑lit or garlanded platforms reduce separate decorating steps but still follow the same electrical and heat‑clearance best practices.
- When adding acrylic risers or cases, use acrylic‑safe cleaners to prevent scratching or crazing.
Practical Tips for DIY and Store‑Bought Village Platforms
DIY or store‑bought?
- Choose DIY when you want custom terrain, precise sizing, or a low‑cost way to add elevation with foam.
- Choose ready‑made when you want fast setup, consistent finishes, or transparent risers that keep sight lines open.
- Specialty multi‑tier stands are useful when you want vertical depth and a compact footprint without building a stepped structure from scratch.
Essential DIY materials and methods
- Foam boards (EPS or XPS) for bases/risers; carve slopes and stack for hills.
- Foam‑safe (solvent‑free) adhesives; avoid solvent glues that can dissolve polystyrene.
- If hot‑wire cutting foam, work with local exhaust/ventilation per shop SOPs; minimize heat to reduce fumes.
- Seal/paint MDF bases and pre‑drill to manage dust and edge swelling.
Setup and leveling tips
- Dry‑fit buildings first, then run cords backward/down to a switched extension accessible under or behind the base.
- Use museum putty/wax/gel sparingly under lightweight items to resist bumps; test on inconspicuous areas first.
- Add non‑slip liners on smooth shelves; shim gently to correct minor level issues.
Finding quality ready‑made options
- Look to major retailers, craft and hobby stores, and holiday specialists for pre‑molded snow platforms and riser sets.
- Clear acrylic risers are common in display suppliers; pre‑lit or multi‑tier stands are typically found through décor brands and specialty retailers.
Specialty Village Platforms: Momentree Christmas Village Display Tree
The Christmas Village Display Tree – Pre‑Lit is a productized Christmas configuration of Momentree’s modular base platform. It retains the multi‑tier structure of the base stand and is specifically configured for arranging miniature buildings, figurines, and seasonal objects. In this configuration, tiers are supplied pre‑decorated with Christmas garland and decorative string lighting.
Key characteristics
- Application identity: Built on Momentree’s modular base platform and configured specifically for Christmas village displays.
- Multi‑tier, modular structure: Multiple display tiers support layered village scenes.
- Pre‑decorated garland: Green branches with red berries and pinecones.
- Pre‑lit lighting: Decorative string lighting with eight selectable modes (including steady on and twinkle/flash styles).
- Brand positioning: Described as easy to set up.
Explore the product: Christmas Village Display Tree – Pre‑Lit
Note: Christmas garland and decorative lighting are part of this Christmas configuration and are not inherent to the base platform in non‑Christmas applications.
Setting Up and Styling a Christmas Village Platform
1) Plan your layout
- Sketch zones: residential, town square, hills, water features.
- Reserve space for cord runs and a hidden area for a switched extension.
2) Build elevation and depth
- Combine a flat base with risers to push tall buildings up and back.
- For organic terrain, stack and carve foam under a snow blanket to create gentle slopes.
3) Secure and stabilize
- Place heavier buildings low and centered. Add small dabs of museum putty under light items.
- If using furniture or shelves, verify they’re level and anchored per child‑safety best practices.
4) Manage cords and lighting
- Use UL‑listed lights and avoid overloading outlets or daisy‑chaining extensions.
- Route leads backward/down behind the scene; label plugs for easy on/off control.
5) Finishing touches
- Blend seams with snow and greenery; add clear acrylic risers for featured figurines without blocking the view.
- Clean acrylic with acrylic‑safe products using a soft cloth; avoid ammonia/alcohol and abrasives.
Momentree Expert Tip: Maximizing Display Impact with Tiered Platforms
- Stage by story: Put key landmarks on upper tiers and create sight‑line paths downward with streets, bridges, and trees so every level reads at a glance.
- Reconfigure through the season: Modular tiered designs let you rearrange levels and restyle vignettes for different scenes or holidays without changing the underlying stand.
- Layer light thoughtfully: Mix pre‑lit garlands (where supplied) with building and street lighting; favor cooler‑running LED sets and keep safe clearance from heat sources.
Frequently Asked Questions
What are the best materials for a Christmas village base or platform?
For flexible shaping and lightweight builds, foam (EPS/XPS) is popular and easy to cut/stack. For sturdy flat bases, MDF or plywood works well; seal MDF against moisture. Clear acrylic is great for unobtrusive risers but needs gentle, acrylic‑safe cleaning. Metal frames appear in modular tiered stands that provide vertical structure.
How do I make a DIY riser for my Christmas village?
Cut foam blocks (EPS/XPS) to size, stack with foam‑safe adhesive, and cover with snow or scenic material. For a transparent look, use clear acrylic risers. If you hot‑wire foam, work with local ventilation per shop SOPs. Test building stability and add small dabs of museum putty under lightweight pieces.
What are the advantages of a pre‑lit, tiered Christmas village stand?
You get multiple display levels in one structure, plus Christmas‑specific décor where supplied. For example, Momentree’s Christmas configuration provides pre‑decorated garland and decorative string lighting with selectable modes—useful when you want layered presentation and coordinated seasonal accents.
How do you keep a Christmas village display stable and safe?
Use a level, sturdy surface; place heavier items low and centered; consider anchoring supporting furniture if children are present. Keep cords organized, avoid overloading outlets, and don’t run extensions under rugs. Maintain heat clearance around lights and décor; prefer cooler‑running LED sets.
Can I use Momentree platforms with non‑Momentree village pieces?
Yes. The Christmas Village Display Tree – Pre‑Lit is designed to arrange miniature buildings, figurines, and seasonal objects—brand‑agnostic. Always check object sizes and follow the stand’s weight guidelines.
Where can I buy commercial Christmas village platforms or bases?
Look to major retailers, craft/hobby stores, and holiday specialists. You’ll find pre‑molded snow platforms, riser sets, clear acrylic lifts, and specialty multi‑tier stands from décor brands.
How do I choose the right size display platform for my village?
Lay out your buildings on paper, add space for roads and rivers, then measure. Leave a perimeter for cords and safe access to a switched extension. Confirm viewing angles and vertical clearance where you’ll place the scene.
Are tiered display trees only for Christmas villages, or do they work for other holidays?
Tiered modular platforms can be restyled for many occasions. Momentree’s base platform is designed to be reconfigured for different seasons and events; the Christmas village configuration is one application.
Related Guides
- Momentree Holiday Display Tree — The reusable modular base platform behind multiple seasonal applications.
Sources and Further Reading
- Lemax – 3‑Pc Snow Display Platform (category example of a village base/platform): https://www.lemaxcollection.com/villages/general-products/landscaping/3-pc-snow-display-platform-34983/
- Lemax – Landscaping category overview (platforms as scene foundations): https://www.lemaxcollection.com/categories/landscaping/?productsort=skuasc
- CottonWorks – Visual Merchandising Terminology (riser definition, PDF): https://www.cottonworks.com/wp-content/uploads/2017/11/1-2_1.pdf
- Sapcote Garden Centre – How to display a Lemax village (base + riser usage; cord routing): https://www.sapcotegc.co.uk/christmas-guides/how-to-display-a-lemax-village/
- Woodland Scenics/Scene‑A‑Rama – Foam Risers Instructions (modular scenic risers, PDF): https://scenearama.woodlandscenics.com/instructions/ST1408inst.pdf
- Building Science Corporation – Guide to Insulating Sheathing (EPS/XPS/Polyiso overview): https://buildingscience.com/documents/guides-and-manuals/gm-guide-insulating-sheathing/view
- Harvard GSD FabLab – Hot‑wire cutting EPS/XPS (ventilation and safety): https://fablab.gsd.harvard.edu/health-and-safety/standard-operating-procedure-sop/hot-wire-foam-cutting-eps-and-xps/
- Starfoam – Adhesives for EPS (foam‑safe adhesives, PDF): https://starfoameps.com/cms/upload/documents/5c48d088c4b3c_documents.pdf
- HSE (UK) – Woodworking FAQs (MDF basics and dust/moisture considerations): https://www.hse.gov.uk/woodworking/faqs.htm
- BobVila – MDF vs. Plywood (strength/sag/moisture behavior): https://www.bobvila.com/articles/mdf-vs-plywood/
- Canadian Conservation Institute – Cleaning Glass & Acrylic Display Cases (acrylic care): https://www.canada.ca/en/conservation-institute/services/conservation-preservation-publications/canadian-conservation-institute-notes/cleaning-glass-acrylic-display-cases.html
- CPSC – Holiday Decoration Safety Tips (electrical/fire safety): https://www.cpsc.gov/Safety-Education/Safety-Guides/Fire-Furniture-Furnishings-and-Decorations/Holiday-Decoration-Safety-Tips
- NPS – Deck the Halls Safely (holiday fire/electrical precautions): https://home.nps.gov/articles/p52-deck-the-halls-safely.htm
- NPS – Conserve O Gram: Museum Storage Shelves (liners and shelf safety): https://www.nps.gov/subjects/museums/conserve-o-gram-4-1b-museum-storage-shelves.htm
- CAMEO (MFA Boston) – Museum Putty (temporary stabilization): https://cameo.mfa.org/wiki/Museum_Putty


